proTUNING Freaks
BMW Garage BMW Meets Register Today's Posts

Go Back   BMW M3 and BMW M4 Forum > BMW F80 M3 / F82 M4 Technical Topics > Cosmetic and Lighting Modifications

Post Reply
 
Thread Tools Search this Thread
      08-13-2015, 08:00 PM   #1
NiceGuyEddie
Lieutenant
458
Rep
512
Posts

Drives: M4
Join Date: Feb 2010
Location: Orlando, FL

iTrader: (1)

Quick and Dirty Performance Grill Surround DIY

Need to dechrome the front end:
Attached Images
 

Last edited by NiceGuyEddie; 08-21-2015 at 07:57 AM..
Appreciate 0
      08-13-2015, 08:03 PM   #2
NiceGuyEddie
Lieutenant
458
Rep
512
Posts

Drives: M4
Join Date: Feb 2010
Location: Orlando, FL

iTrader: (1)

Stick your paws in between the grill slats and push down the tabs. Start with the top and press the clips down. Choke back tears on the bottom ones and compress them upwards. You can use a short flathead screwdriver wrapped with tape to help pry from the back. Take your time and apply consistent pressure all the way around. Once you have one side out, go in from the back of the other side:
Attached Images
 

Last edited by NiceGuyEddie; 08-21-2015 at 07:57 AM..
Appreciate 0
      08-13-2015, 08:04 PM   #3
NiceGuyEddie
Lieutenant
458
Rep
512
Posts

Drives: M4
Join Date: Feb 2010
Location: Orlando, FL

iTrader: (1)

Swap the surrounds into the stock grill inserts. Sadly, this was only a one beer job:
Attached Images
 
Appreciate 2
      08-13-2015, 08:05 PM   #4
NiceGuyEddie
Lieutenant
458
Rep
512
Posts

Drives: M4
Join Date: Feb 2010
Location: Orlando, FL

iTrader: (1)

Snap them sumbitches back in. Finish beer.
Attached Images
  
Appreciate 4
      08-14-2015, 12:15 AM   #5
jballs16
Captain
jballs16's Avatar
United_States
549
Rep
776
Posts

Drives: ‘21 RS6, RR LWB, Raptor
Join Date: Jul 2013
Location: so cal

iTrader: (0)

👍🏼
Appreciate 0
      08-23-2015, 03:27 PM   #6
S65V8
*_*
United_States
808
Rep
3,160
Posts

Drives: ...
Join Date: Apr 2009
Location: Los Angeles, CA

iTrader: (10)

QDDIY it is now known as.
Appreciate 0
      01-01-2016, 06:15 PM   #7
JeffDaKid3
Second Lieutenant
United_States
15
Rep
227
Posts

Drives: 2020 BMW i8
Join Date: Jun 2011
Location: Queens, NYC

iTrader: (0)

I swap the grills but now i can't get the hood to close with the weather strip, if i remove it the hood closes does anyone know what it could be or how the weather strip should be
Appreciate 0
      01-01-2016, 10:13 PM   #8
TooFan328i
First Lieutenant
224
Rep
382
Posts

Drives: 2016 YMB M3
Join Date: Jun 2015
Location: CNJ

iTrader: (1)

Wow! I saw a couple of DIYs and they showed that the way to do this is to open up the front bumper's screws from the top and remove the weather stripping to get to the grilles. This looks far easier! No need to get into the trouble of opening up the bumper assembly.
Appreciate 1
      01-02-2016, 12:48 AM   #9
Swancoat
Lieutenant
136
Rep
504
Posts

Drives: E92 M3
Join Date: May 2009
Location: Houston

iTrader: (0)

I use a radiator hose removal tool. I just cut the sharp end off and wrapped some tape on it. These are like $8. Truly no need to remove those top screws.

Like OP says - one you get one off, just reach in with your hand to do the other.
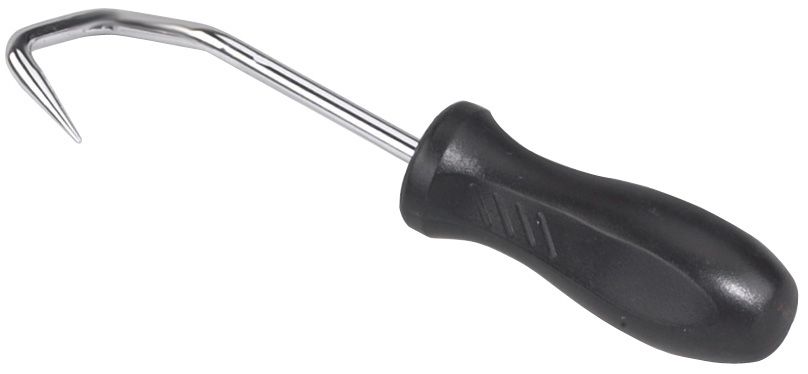
Appreciate 0
      01-03-2016, 09:20 AM   #10
IM2C
Major General
IM2C's Avatar
2067
Rep
5,373
Posts

Drives: ∞ Improbability Drive
Join Date: Oct 2005
Location: FL

iTrader: (9)

Found this on f30post.com. 30 sec grille replacement DIY.

http://f30.bimmerpost.com/forums/sho....php?t=1183240
__________________
///| g87 | f87 Comp | g29 M40i | f97 Comp | f80 Comp | f80 | f30 | e92 | tt | S5 | e92 | 350z | e90 |
Appreciate 0
      01-03-2016, 01:31 PM   #11
larryn
Lieutenant General
United_States
2148
Rep
10,176
Posts

Drives: '97 332ti, '21 X5 45e, '16 GT4
Join Date: May 2005
Location: Seattle

iTrader: (2)

Quote:
Originally Posted by f80 View Post
Found this on f30post.com. 30 sec grille replacement DIY.

http://f30.bimmerpost.com/forums/sho....php?t=1183240
I saw that too, but it seems that the OP is the only one who was successful with hat method. Did you try it?

I am still 3-4 weeks away from redelivery, or else I would try this, since it is only supposed to be a minute to try.
Appreciate 0
      01-03-2016, 02:17 PM   #12
ronanz
Gettin It Figured Out
ronanz's Avatar
United_States
1820
Rep
2,669
Posts

Drives: 435i FBO PS2 bm3 w/ options
Join Date: Jul 2014
Location: Southwest Region

iTrader: (3)

Quote:
Originally Posted by f80 View Post
Found this on f30post.com. 30 sec grille replacement DIY.

http://f30.bimmerpost.com/forums/sho....php?t=1183240

^^^ This is definitely the way to go...


.
__________________
.

My Build Thread can be found HERE
Appreciate 0
      01-03-2016, 02:35 PM   #13
IM2C
Major General
IM2C's Avatar
2067
Rep
5,373
Posts

Drives: ∞ Improbability Drive
Join Date: Oct 2005
Location: FL

iTrader: (9)

Quote:
Originally Posted by larryn View Post
I saw that too, but it seems that the OP is the only one who was successful with hat method. Did you try it?

I am still 3-4 weeks away from redelivery, or else I would try this, since it is only supposed to be a minute to try.
Yep. You need to use your new grills as a reference in order to locate tabs. I started at the outboard side tab and worked my way around the grill. Keep in mind that you need to remove one side only using this method.
__________________
///| g87 | f87 Comp | g29 M40i | f97 Comp | f80 Comp | f80 | f30 | e92 | tt | S5 | e92 | 350z | e90 |
Appreciate 1
      01-09-2016, 12:30 PM   #14
nupak
New Member
2
Rep
24
Posts

Drives: 2008 E92 M3
Join Date: Dec 2008
Location: Florida

iTrader: (0)

Hey thanks as I was planning to do the long way and saw ur post....10 mins tops with sore finger but easy.....thanks bro
Appreciate 0
      01-09-2016, 01:29 PM   #15
minn19
Lieutenant General
minn19's Avatar
14038
Rep
10,080
Posts

Drives: 24 Z06, 23 CT4VBW, 22 PFinder
Join Date: Jul 2013
Location: Minnesota

iTrader: (0)

Just did this last night and it took 10 minutes. Thanks for the thread and idea. I was going to do it the old traditional way, but this was much quicker and easier.
Appreciate 0
      01-09-2016, 10:38 PM   #16
TooFan328i
First Lieutenant
224
Rep
382
Posts

Drives: 2016 YMB M3
Join Date: Jun 2015
Location: CNJ

iTrader: (1)

I tried and wasn't able to make it. It was a bit rainy here today, so I couldn't try for more than 30 mins. Instead of the grilles, I ended up installing the diffuser
Appreciate 0
      01-09-2016, 11:01 PM   #17
TooFan328i
First Lieutenant
224
Rep
382
Posts

Drives: 2016 YMB M3
Join Date: Jun 2015
Location: CNJ

iTrader: (1)

Quote:
Originally Posted by minn19 View Post
Just did this last night and it took 10 minutes. Thanks for the thread and idea. I was going to do it the old traditional way, but this was much quicker and easier.
I had difficulty in getting to the bottom ones and the one notch on the left hand side. I started to work on the passenger side, and was able to remove the ones from top and the one on the right side. The bottom ones and the one on the left were not easy to get to. I will try a taped screwdriver next time. Any other tips?
Appreciate 0
      01-09-2016, 11:05 PM   #18
minn19
Lieutenant General
minn19's Avatar
14038
Rep
10,080
Posts

Drives: 24 Z06, 23 CT4VBW, 22 PFinder
Join Date: Jul 2013
Location: Minnesota

iTrader: (0)

Quote:
Originally Posted by TooFan328i View Post
I had difficulty in getting to the bottom ones and the one notch on the left hand side. I started to work on the passenger side, and was able to remove the ones from top and the one on the right side. The bottom ones and the one on the left were not easy to get to. I will try a taped screwdriver next time. Any other tips?
Not really, I just kept firm pressure by pulling from the middle of the grill with one hand while messing with the bottom clips with the other. Then they just popped out. I did break one lower female clip on the bumper, but it is held in by plenty of others and isn't going anywhere. Sorry, probably doesn't help much.
Appreciate 0
      01-10-2016, 08:06 AM   #19
NiceGuyEddie
Lieutenant
458
Rep
512
Posts

Drives: M4
Join Date: Feb 2010
Location: Orlando, FL

iTrader: (1)

Quote:
Originally Posted by TooFan328i
Quote:
Originally Posted by minn19 View Post
Just did this last night and it took 10 minutes. Thanks for the thread and idea. I was going to do it the old traditional way, but this was much quicker and easier.
I had difficulty in getting to the bottom ones and the one notch on the left hand side. I started to work on the passenger side, and was able to remove the ones from top and the one on the right side. The bottom ones and the one on the left were not easy to get to. I will try a taped screwdriver next time. Any other tips?
The screwdriver really helped me. Not much clearance for the bottom ones. You have to press the center section of the clip upwards. Use steady pressure and pull out on the grill at the same time with your other hand. It hurts like a bitch, unfortunately.
Appreciate 0
      01-10-2016, 04:07 PM   #20
TooFan328i
First Lieutenant
224
Rep
382
Posts

Drives: 2016 YMB M3
Join Date: Jun 2015
Location: CNJ

iTrader: (1)

Quote:
Originally Posted by NiceGuyEddie View Post
The screwdriver really helped me. Not much clearance for the bottom ones. You have to press the center section of the clip upwards. Use steady pressure and pull out on the grill at the same time with your other hand. It hurts like a bitch, unfortunately.
Makes sense. That's what I thought might be the only way. Thanks for validating.
Appreciate 0
      01-10-2016, 04:08 PM   #21
TooFan328i
First Lieutenant
224
Rep
382
Posts

Drives: 2016 YMB M3
Join Date: Jun 2015
Location: CNJ

iTrader: (1)

Quote:
Originally Posted by minn19 View Post
Not really, I just kept firm pressure by pulling from the middle of the grill with one hand while messing with the bottom clips with the other. Then they just popped out. I did break one lower female clip on the bumper, but it is held in by plenty of others and isn't going anywhere. Sorry, probably doesn't help much.
This does. At least, it tells me that if I am not careful, I can damage the bumper's slots. Thanks bud.

Last edited by TooFan328i; 01-10-2016 at 04:52 PM.. Reason: tense!
Appreciate 1
      01-10-2016, 04:22 PM   #22
Xtabi
Colonel
Xtabi's Avatar
United_States
1702
Rep
2,127
Posts

Drives: 2016 M3
Join Date: Jan 2008
Location: Ohio

iTrader: (0)

I put my grills in back in early November and did not need to disassemble anything in the engine bay either.

Like others said just undo one tab at a time while applying outward pressure with your other hand.

One tip that I have not seen posted before that I will share is to try to do it in warm weather. The warmer the plastic is the easier it will be to move. It was only in the 50s when I did. I did not use a heat gun or anything like that. You could park it in the driveway pointed at the sun to warm it up too.

Good luck!
__________________
2016 F80 | MG/SO | DCT | Adaptive M Suspension | 19" Black 437M Wheels | CF Roof | CF Trim
Appreciate 0
Post Reply

Bookmarks


Posting Rules
You may not post new threads
You may not post replies
You may not post attachments
You may not edit your posts

BB code is On
Smilies are On
[IMG] code is On
HTML code is Off


All times are GMT -5. The time now is 06:57 AM.


f80post
Powered by vBulletin® Version 3.8.11
Copyright ©2000 - 2024, vBulletin Solutions Inc.
1Addicts.com, BIMMERPOST.com, E90Post.com, F30Post.com, M3Post.com, ZPost.com, 5Post.com, 6Post.com, 7Post.com, XBimmers.com logo and trademark are properties of BIMMERPOST